
Adeel here. You should consider running Facebook ads. It’s one of the best ways to promote your products to more than 2.45 billion people around the world.
In one survey, 78 percent of Americans said that they’ve discovered new products to buy while cruising through the platform.

Fortunately, you can get great results with Facebook Ads even if you don’t have thousands of dollars to spend. Part of this is because of the incredible targeting abilities that Facebook gives you, which we’ll get into soon.
If you’ve never used Facebook ads before, don’t worry. That’s what this chapter is for. 😉
I’ll guide you through exactly how to set up, run, test, and optimize your Facebook ads campaigns.


An Intro to Facebook Advertising Costs
There’s no predefined budget that you have to set for Facebook advertising.
Depending on your situation, your ad spend could be as much as $50 per day, or as little as $5.
→ Click Here to Launch Your Online Business with Shopify
However, you should make yourself aware of Facebook advertising costs before you decide on a budget. This is crucial to ensure that you’re spending just the right amount of money to get desired results.
To get an idea of the costs, let’s take a look at how much you’d need to pay for a click on your ad.
According to WordStream, the average cost-per-click for Facebook ads is $1.72 across all industries.
But not every industry has such a high average. For example, Facebook ads for travel & hospitality businesses cost $0.63 per click on average.

Depending on what industry your business is in, your per click costs would be somewhere between $0.50 and $2.00.
Remember, you should take these averages with a pinch of salt. That’s because your actual costs will vary depending on your:
- Target audience
- Competition
- Daily and lifetime budget
Let’s talk about each of these a bit more.
Target Audience
People with certain demographic and psychographic profiles cost more to reach than others.
So if you’re targeting a highly sought-after audience, your Facebook ad costs will be higher. It’s basic economics: supply and demand.
As a result, you might be tempted to slim down your target audience to narrow the pool of your competition.
But beware. Creating small target audiences can lead to higher costs because there are fewer placements available, or fewer places your ad can be shown.
Competition
Arguably, this is the key factor that influences your Facebook ad costs.
Why? Once again, supply and demand.
If there were no other businesses trying to reach your target audience, there would be no demand and so your Facebook advertising costs would fall.
But let’s get back to reality. Your Facebook advertising costs will largely depend on how many competitors you have, and what they’re willing to spend.
Daily and Lifetime Budget
Although there are countless variables at play, there are two surefire ways to define your Facebook advertising cost: your bid and your budget.
Your budget is the overall amount of money you’re happy to spend on a single ad set or campaign.
What’s more, Facebook provides two budget types:
- Daily Budget: The average amount you’re willing to spend on a campaign each day
- Lifetime Budget: The amount you’re willing to spend during the entire campaign

Your bid is how much you’re willing to spend to land an ad placement.
If you don’t choose a bid, Facebook will automatically calculate one based on your chosen budget and the duration of your campaign.
Now that you have some knowledge of Facebook advertising costs, let’s have a look at what you need to do before you make your first campaign.
Types of Facebook (and Instagram) Ads
As you may know, Facebook bought Instagram in 2012. That means that you control ads for Facebook and Instagram inside the same Facebook Ads Manager.
So the point is that there are a whole lotta ad types that you can choose from. Let’s look at the three most common ones:
- Image and video ads
- Carousel ads
- Story ads
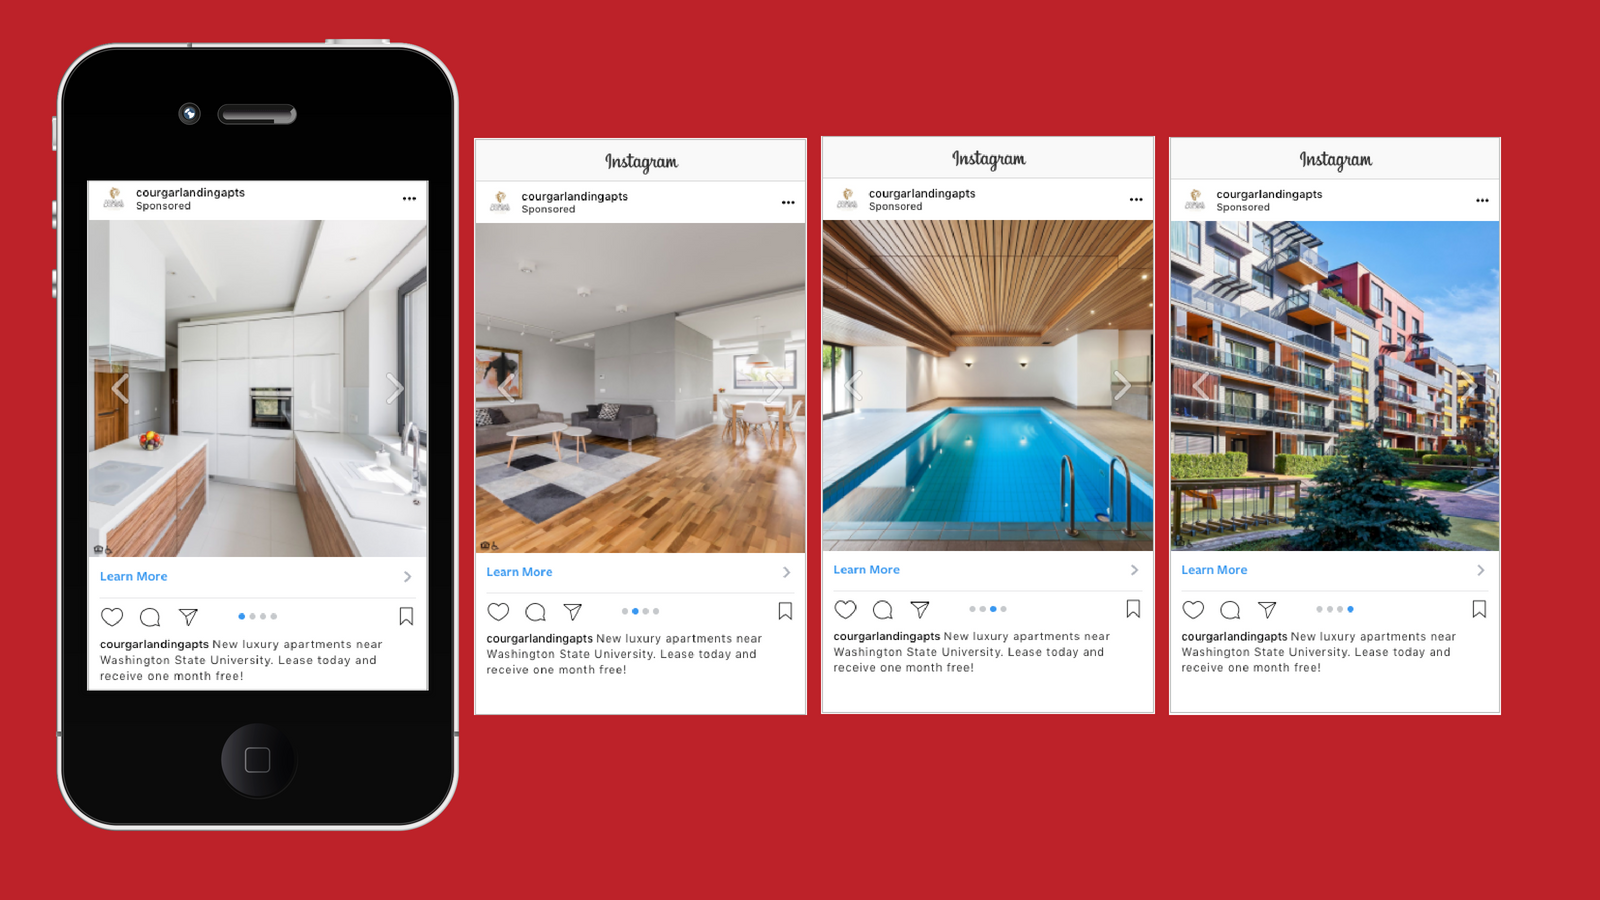
Image and Video Ads
These show up in user feeds the same way that organic posts from other users do, so your ads can be front-and-center in the user’s experience. As you may have guessed, an image ad refers to an ad that features an image, and a video ad features a video.
These ads include a call-to-action (CTA), or a button that encourages users to take a specific action, like:
|
|
Here’s an image ad from Doodly, a doodle video-making tool.

And here’s a cool video ad example from Volvo that invites users to take a “thumb drive” of its new XC60 luxury SUV.

Carousel Ads
Carousel ads function in a similar way to organic posts that feature more than one image or video. They appear in a user’s feed along with other posts, allowing you to show up to ten images or videos per post. What’s cool is that each of these items can have their own unique link to lead your users to.
You can use these to highlight a few sale items and lead potential customers to your website to shop, or show several photos of the same product.

Story Ads
Story ads are immersive, full-screen units that let your brand infuse creativity to make the ads more appealing for your audience.
According to the findings from Kenshoo’s quarterly trends report, advertisers’ are spending more and more on Story ads. Their spending doubled year-over-year from 9 percent to 18 percent in the second quarter of 2019.
Story ads pop up in between Facebook and Instagram Stories from the accounts people follow. They can deliver a positive experience to potential customers. They also feature a call-to-action at the bottom.

To make money with Story ads, run a campaign that promotes your product or service, and ensure you add a call-to-action at the bottom to encourage people to buy.
You’ll have a choice in ads to publish either an image or a video. Whatever you decide, make sure your Story is attention-grabbing to snag the users who swipe fast through their content.
Here’s a great video if you want to learn more about Story ads.
Get Familiar With Facebook Ads Manager
In this section, we’re going to get familiar with Facebook’s Ads Manager so you understand what button is where, and how the important things work.
Then, we’re going to install your Facebook Pixel. Your Pixel is super important for making sure that your ads perform well, so don’t skip that part!
To set up and manage your ads, you’ll need to go to your Facebook Ads Manager. When you made a business page in the last chapter, Facebook automatically made an Ads Manager account for you.
You can access it from the tab on the left side of your personal Facebook profile.

The other way to access it is through the Settings menu. You can open it by clicking the little down-pointing arrow at the top-right corner of your screen, then clicking “Manage Ads.”
Research Your Audience
The Ads Manager menu is broken up into different sections. To identify the right audience to target, go to the “Plan” section and click “Audience Insights.”

The Audience Insights tool shows you detailed information on any audience targeting metrics you choose.

These are your options for selecting an audience.
You should avoid using generic interests, like nature, sports, or food, and choose very specific ones instead: relevant brands, authors, books, magazines, websites or even other Facebook pages.
Use the results to make decisions about your strategy. For example, if you find that the majority of your audience are men, you can run more masculine ads. Or if they like a particular product, you can offer that product on your store and run ads to it.
Let’s say I want to sell camping gear. In the “Interests” section, I can go to “Sports and outdoors,” then “Outdoor recreation,” then select “Camping.”
I see that men aged 25-34 are the biggest market, making up about 27 percent of the people on Facebook who like camping.

| 🕒 Tip Time
If you look at the “Page Likes” tab in Audience Insights, you can see what pages your audience likes. If you notice that a lot of the people who have “liked” your page also tend to “like” another page, you can create ads targeting people who like that other page. |

After you’ve created a list of potential interests, click the “Save” tab and give your audience a name. Now click the “Save” button at the bottom. This will save the audience you defined in the Audience Insights tool. The audience will then be available in the “Audiences” section of your Ads Manager.
Install Your Facebook Pixel
First, you have to set up your Facebook Pixel on your website.
| 📖 Ecommerce Dictionary
Facebook Pixel: A small piece of code you put on your website pages to track activity that users take when they’re on those pages. The Pixel captures information on your visitors like what they bought, what pages they visited, and more. |
You can think of the Pixel as a “smart” tool that progressively learns about the people who are more likely to buy. The tool then shows your ads to people who fit those characteristics.
Let’s install it.
Go to your Facebook Ads Manager, click “All Tools,” and select “Pixels.”
![]()
Now click the “Create a Pixel” button and give a name to the Pixel.

I recommend naming it after your store. Then click “Create.”
Next, you’ll be asked how you want to install it. If you’re logged into Shopify in the same browser, it will know (creepy Facebook). Select “Set Up Using Shopify (online).”
It will give you your Pixel ID, which is a numeric code. Copy that code and paste it into Shopify by following these steps:
- Log into your Shopify account
- In the Shopify admin area, choose “Sales Channels” > “Preferences”
- Find the “Facebook Pixel” field in the Google Analytics Section
- Paste in the Pixel code
- Click “Save” at the bottom of the screen

| 🕒 Tip Time
Take advantage of the “Send test traffic” feature in Facebook to make sure the Pixel is working. Type in your store’s URL, click “Send test traffic,” and wait for the little red dot that says “No activity yet” to change to “Active.” Once the red dot turns into a green dot, click “Continue.” |
And you’re ready to roll. 🚲
Set Up Your First Campaign
To create a campaign, go to your Facebook Ads Manager, open the “Campaigns” tab, and click “Create.”

You will immediately see a list of the main campaign objectives that you can choose from:

If you’re promoting an online store with Facebook advertising, you’ll want to choose either the “Store traffic” or “Conversions” objective, because that’s what Facebook will optimize for – website traffic or website conversions.
| 📖 Ecommerce Dictionary
conversion: When a web user completes one of your desired goals. This goal can be a wide range of activities like clicking your ad, signing up for your newsletter, adding a product to their shopping cart, or buying a product from your store. |
Choose “Conversions,” give a name to your campaign, activate “Campaign Budget Optimization,” enter a daily budget, and click “Continue.”

I highly recommend using the new Campaign Budget Optimization (CBO) feature. This allows you to set a budget at a “campaign level” rather than at the “ad set level.”
CBO looks at your ad sets that perform better, then sends your budget to those. It does that on an opportunity-by-opportunity basis to get you the best results. CBO also aligns with your bid caps and spend limits for each ad set.
Remember that CBO may not distribute your budget equally towards each ad set. For example, if you have three active ad sets in a single campaign, it may spend 80 percent of your budget on the first ad set if it’s performing well. But it won’t spend more than your daily or lifetime budget.
Here’s a graphic showing how it works:

Basically, CBO saves you time by choosing where your budget will be best spent.
Define Your Conversion Event
Conversion events tell Facebook where you want to send traffic.
At the beginning, choose “View Content” as the conversion event. This will tell Facebook to show your ads to those who are most likely to click on them to visit your store.
Once the Facebook Pixel gathers some data from the activity on your website, you can use “Add to Cart” or “Purchase” as the conversion event. This will tell Facebook to show your ads to people who are most likely to buy your products.
| 🕒 Tip Time
It can take a few weeks for the Facebook Pixel to gather and display activity data, so be patient. |
Choose Your Audience, Budget, and Schedule
The next step in the process involves choosing an audience.
Facebook lets you target certain demographics, behaviors, and interests. Plug one or a few things you’ve already discovered into the “Detailed Targeting” section. For example, a supplements store can write “protein shake” as an interest.

You can create an audience from scratch, or use the one you created with the Audience Insights tool.
If you do it during the ad creation process, you’ll get the option to expand your targeting. This feature will help your ads reach more people when they’re likely to perform well.
Custom Audiences let you reach the people who’ve shown interest in your store.
To set up a Custom Audience, follow these steps:
- Open your Facebook Ads Manager
- Select “Audiences”
- Click “Create a Custom Audience”
From the list of options, consider targeting those who have already visited your website. You can also target those who have visited certain product pages. This process is known as “retargeting.” You can use retargeting to remind people about products they’ve browsed on your store.

One important thing to note is that the Facebook Pixel should be installed on your website. Without it, Facebook can’t gather the data on your visitors. Make sure to install it before you attempt to create a Custom Audience.
| 🕒 Tip Time
Another great type of audience is called a Lookalike Audience. This allows you to target those who share the same characteristics as your Custom Audience. It’s almost the same process as making a Custom Audience (just select “Lookalike Audience”). But for now, you can skip Lookalike Audiences, as they work best when you have a good idea of your best audience. Use them later on, when you’re looking for new ways to optimize your campaigns. |
Once you’ve found an optimal audience, Facebook will ask you how much you’d like to spend, and when you’d like your ads to appear.

If you activated Campaign Budget Optimization at the beginning, you won’t need to do anything. Just make sure to enter a decent daily budget ($5-10 works for most beginners).
Also, set your bid strategy to “lowest cost.” This will tell Facebook to spend your whole budget and get the most clicks at the lowest price.
Then, choose to run your ads between a certain date or continuously. If you choose to enter a start and end date for your campaign, and you see that it’s not working well for your Facebook ads, you can always go back and change the schedule.
Also, make sure that Facebook charges you for a link click and not an impression by clicking “Show more options” and choosing “Link Click (CPC)” under “When you are charged.”
Once you’re happy with the budget and schedule, you can move on to the ad design.
Design Your Ad
There are two ways to design an ad: a new ad from scratch or choose an existing post that you’ve already published on your page.
Also, decide whether you want to use a single image or video in your ads, or go with multiple images and/or videos (also known as carousel or multi-product ads, as well as collections).

Let’s keep it simple since it’s your first campaign and choose “Single Image or Video.” Then, once you get familiar with it and understand what to look for and how to improve your performance, you can go crazy with more complex types of ads.
Try using a video because they’re an incredible way to get engagement. Our guide on creating product videos has a lot of tips to help get you started.
| 🏆 From the Pros
Dropshipping pro Ryan Caroll started his first women’s swimsuit business in 2016, fresh out of high school. After two months, his sales started doubling every month and he made $60,000 in four months. He believes that videos were a big help for getting him there: “When I first launched the store, I was running basic photo ads, and then when competitors started coming in, I could tell that my ads weren’t doing as well as they once were. And then I realized eventually it started slowing down and my Facebook ads were just getting crappy. I was like, ‘I really needed to custom-brand this with my own video ads.’ That will completely set you aside from all of your competitors, 100 percent.” |

Bonus: If you’re interested to hear more insights from Ryan, take a look at this video where he discusses some ideas for what to include in video ads.
After uploading an image or video, fill in the details of your ad in the next section.
Add:
- Text: The main text of the post. You’ll link the button to a URL on your site, but you should also paste a shortened version of the same link inside the body. You can use bitly for this.
- Website URL: The page you want to point to – this page should directly mirror the content in your ad, or you’ll get poor results.
- Headline: What they’ll see below your photo or video, next to the call to action button.
- Call to action: Choose what the clickable button will say.

When you’re done, scroll to the bottom and click “Confirm.”
Congratulations – you’ve just created your first Facebook advertising campaign!
Use Your Ads Data to Do Even Better
Once you’ve created ads in your Ads Manager, let them run for a few days and then analyze the results. Looking at this data is absolutely critical if you want to make your campaigns better in the future.
Think about it – what’s the point running ads if you don’t understand how they’re performing? 🤔
Your Facebook Ad data lets you see what’s working and what isn’t. And, you can use that data to optimize your campaigns for the next round… and the next one, and the next one.
Here’s an example.
Let’s say you spent $100 on Facebook ads, and you got five sales. That means you spent $20 on each sale. That’s pretty good when you’re starting out, but you need to try and make progress with each ad that you launch.
If you dig into your Facebook Ad data and use it to guide your new campaigns, you can optimize your ads and reduce the amount of money you spend per sale.
So, you could end up spending $15, or even $10 for a sale using your data. That means more money to keep as profit or reinvest into your business.
| 🕒 Tip Time
As many dropshippers will tell you, it can take a lot of work – and a lot of errors – to make the most of your Facebook Ads. You’ll need to find the perfect combination of creative, targeting, and spend for your Facebook campaigns. And even then, the problem might just be that all your campaigns are great, but nobody actually wants to buy the product you’re advertising. That’s why you need to approach Facebook Ads with patience and a willingness to learn. You should constantly be looking at your analytics data, learning best practices, and making changes to your campaigns. Don’t give up! |
Understanding Important Metrics
Facebook offers dozens of metrics, so let’s just stick with the basics for now:
- Reach: The number of people who saw your ad in their feed.
- Impressions: How many times your ad showed up in people’s feeds (this number will be higher than your reach if some people saw your ad more than once).
- Frequency: The average number of times each person has seen your ad.
- Link clicks: The number of times someone clicked on a link in your ad.
- CTR (click-through rate): The percentage of times that someone saw your ad and clicked a link.
- CPC (cost per click): The average price you pay for each link click.
In addition to CPC, Facebook also lets you look at the cost for several other activities, like each time someone adds an item to their cart (“cost per add to cart”).
You can even see when someone starts to check out but doesn’t finish, and how much you’re paying for that (“checkout initiated” and “cost per checkout initiated”).
Here are a few starter tips for optimizing your first round of ads:
- Don’t freak out if you don’t get any sales from your first round. Early on, your Facebook Pixel is warming up and collecting user data. Focus on things like reach, impressions, and clicks, which will tell you if your targeting and ad creatives are on the right track while your Pixel does its thing.
- CTR can give you a good idea about whether you’re targeting the right audience, or if your ads need some work because people didn’t find them enticing. If your CTR is lower than 0.5 percent, your audience might be too narrow – try making it broader. If you already have a broad audience, try tweaking your ad’s text and visuals to better capture your audience’s attention and raise your CTR.
- Divide your content views by your link clicks to calculate your “bounce rate.” If your bounce rate is more than 55 percent, try optimizing your landing page. Make sure that your ad is linked directly to the product page of the item you’re promoting, and that it’s clear what your product is for shoppers who land there.
How to Find Your Data in Ads Manager
The easiest way to see your campaign’s performance is to use the “Campaigns” tab. This section of the Ads Manager lets you see loads of important data.
You can also change the metrics you see by clicking “Columns.” For example, you can check the Performance & Clicks report to see how the ad is doing overall.

| 🕒 Tip Time
Stay tuned for Chapter 10, where we’ll give more tips for ways you can keep improving your ads. |
Finally, check your Facebook ad campaigns by different breakdowns:

With Breakdown, you can very quickly analyze your results by various segments.
For example, look at age, gender, and placement to try and find any hidden gems that worked well.
Age: Look for the best performing age group, and target the entire campaign there. If several age groups are performing well, you could split them into several ad sets to get a better result.
Gender: If you see that either men or women are converting more on your products, exclude the other gender focus on only one.
Ad Placement: Find out if your customers are buying products more on desktop or mobile. Look at placement breakdown metrics and exclude placement that isn’t converting.
Find those opportunities and focus on the elements that are giving the best results.
If you’re looking for more info, you can also check out our video guide to interpreting your Facebook ad results below:
A Note About Facebook’s Advertising Policies
Facebook reviews all ads to make sure they meet its advertising policies. If your ads constitute any prohibited content, it’s going to get disapproved. Some of the things you’re not allowed to advertise include:
❌ Tobacco and related products
❌ Illegal or counterfeit items
❌ Unsafe supplements
❌ Adult products
❌ Anything that makes health claims
Facebook also doesn’t like excessive text in ad images. Make sure the text you use in your images doesn’t occupy more than 20 percent of the total space. Fortunately, this is simple to do with Facebook’s Image Text Check tool.

There are rules related to video ads and targeting too, which you can read on Facebook’s Advertising Polices page.
👉 That’s it! You’ve learned the basics to start getting more eyeballs to your store and making some sales with Facebook ads.
Now, it’s time you follow these steps above and create your first successful Facebook ad campaign.
